Jennifer Briddon, Tracerco UK
One area which can be overlooked when considering pipeline inspection, despite the impact it can have on the success of a scanning campaign, is the pre-project calibration or factory acceptance testing of the inspection instrument. A well planned and targeted pre-project calibration test can be designed to focus on maximizing the capabilities for expected conditions and defects, while maintaining resilience to natural variations in these parameters. An inadequate or poorly planned pre-project calibration test can result in poor quality information, which could lead to an unexpected failure of the item being inspected.
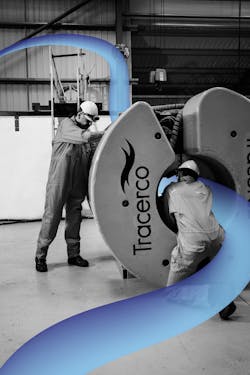
Tracerco’s Discovery, the world’s only field proven subsea computed tomography (CT) scanner, has been used in a number of inspection projects in the North Sea, Gulf of Mexico, and West Africa. It provides asset integrity and flow assurance data on a range of pipeline systems. Prior to any offshore inspection campaign using the CT scanner, pre-project calibrations are performed to help ensure that the maximum quality of the data is produced for each operator, and to improve analysis as well as expedite reporting times.
CT scanning
Operating along the same general principles as CT scanners used in hospitals worldwide, Discovery is a non-intrusive external scanning technique designed specifically for subsea pipeline inspection. As it is non-intrusive, it does not affect the operation of the pipe, or require removal of any external coating applied to the pipe prior or during inspection. It is adept at scanning through 50 mm (2.17 in.) of heavy concrete weight coats as it is at scanning through micron-thick fusion bonded epoxy coatings.
The principle behind Discovery (and CT scanning) is relatively simple – the inspection beam passes through a material and the density of this material can then be calculated by how much the beam is weakened (this is the attenuation coefficient of the material). Reconstruction models then take this information and use it to generate an accurate image of the scanned item. As CT scanning produces a complex grid of data, it is often likened to a sudoku puzzle, except one which can only be “solved” using computers and iterative algorithms. While this analysis is complex, the advantage of CT over other inspection techniques is that it can generate information about the pipeline wall thickness and integrity, the product flowing conditions and the condition of any coating applied to the pipeline, all in a single scan.
Targeted testing
The Lloyd’s Register Discovery certification program, performed in 2017, demonstrated that its scanning and analysis software could provide a measurement capability equivalent to that provided by conventional magnetic flux leakage (MFL) inline inspection tools, in terms of the probability of detection (POD) and sizing accuracy for detecting metal loss type anomalies. The testing program was performed on pipelines of a range of dimensions which covered approximately two-thirds of the most commonly used pipes. For pipelines outside of this range, a specific pre-job calibration is required. Pre-job project calibrations are always recommended and advised for all the scanner’s inspection campaigns, in the same manner as the standard MFL approach for performing pre-project pull-through testing to help ensure a successful inline inspection campaign.
The precise goal of a pre-project calibration for the scanner may vary depending on the exact parameters of the pipe to be scanned, type and nature of any expected anomalies and defects within the pipe. Typical goals for a pre-project calibration include:
• Determination of “hits” (variations in wall thickness which can be matched to known features confirmed as valid from alternative pipeline inspection methods) and “misses” (variations which were missed by the scanner but identified by the alternative pipeline inspection method)
• Determination of sizing accuracy and standard deviation values (in particular if these are outside of those recognized by the 2017 Lloyd’s Register certificate)
• Determination of the most likely features identified in either the pipeline or fluid, and the associated feature reporting tolerance
• Determination of the most suitable feature detection and wall thickness analysis algorithms from Tracerco’s bespoke Discovery analysis software.
Real-time results
Discovery CT image reconstructions are available immediately offshore, allowing for a preliminary real-time assessment of the data. This includes wall thickness measurements for any identified defects, product bore analysis, or deposit detection. The results can also be used by an operator to help target inspections. For example, if an area is inspected which contains an unexpected level of build-up, an operator may choose to perform additional inspections at this location to monitor for the presence of any under-deposit corrosion. For a Discovery inspection, an additional benefit of a representative pre-project calibration is that it allows Tracerco’s offshore technicians to determine the likely early-scan indicators that can be used to confirm if a significant wall thickness variation is present at the scan location. This is of value for an operator who has chosen to use the system’s “fast scanning” technique. The scanner, which was developed by the company for rapid pipeline inspection, was formally unveiled in January 2018 and can reduce overall scan time by a factor of five.
In summary, it has been proven that it is possible to detect potential anomalies and defects by identifying a key characteristic in the scan data prior to a full scan being performed. Although these characteristics do not include enough information to enable the dimensions of the anomaly to be determined to within Discovery’s stated tolerances, the fact that the anomaly can be identified means that a scan can be performed only where it will add value, i.e. at areas with significant defects. Once this characteristic has been identified then a full scan to enable complete characterization of the defect can be performed. If this characteristic is not present, then this scan can be terminated, and the next position can be scanned. Using the fast scanning technique in this way helps maximize the amount of valuable inspection data for the operator, while helping to minimize the overall project duration for the same inspection area.
Improved project delivery
Performing a pre-project calibration also has additional benefits for the onshore project delivery process. If the parameters (wall thickness, defect type, pipe fill, etc.) used in the pre-project calibration are confirmed to be sufficiently representative of the parameters seen offshore, then it is reasonable to assume that analysis values derived from the calibration will also be the same. For a Discovery inspection campaign, this can (depending on the number of individual full scans to be assessed) reduce the overall final reporting time by a factor of four.
In the project illustrated here, the pre-project calibration approach was successfully applied as the company detected a small pinhole type metal loss anomaly at the bottom of line. When the inherent Discovery under sizing tolerance is considered, it is possible that this defect could be a significant area of concern. This could have been missed using a simple rejection limit-based approach (which potentially could have been used if a representative pre-project calibration had not been performed). However, the pre-project calibration had been performed with the operator providing a representative sample with similar defects which had been recovered from a pipeline failure in field. Consequently, both the analysis technique and the technicians offshore were able to easily detect and size this defect.
Apart from this single defect, no other anomalies were identified in any of the other segments of the flowline at the chosen inspection locations. This information provided the operator with good confidence about the condition of the rest of the line.
Conclusion
Although a pre-project calibration is not, by itself, an important component of pipeline inspection and integrity, a good calibration test can help ensure the complete success of an inspection campaign. By targeting and refining the analysis approach during the pre-project calibration, the results can be provided quicker and with a higher degree of accuracy and confidence. •


