New depth-independent, high resolution subsea pipeline inspection tool released
Matthew Kennedy - AGR Integrity UK
Nick Terdre - Contributing Editor
External scanning of pipelines traditionally is undertaken by divers who require support vessels. AGR Group’s Neptune system, however, provides inspection without diver intervention and associated availability issues and depth limitations.
Neptune combines an external state-of- the-art ultrasound scanner with a small ROV. The system can be mobilized anywhere in the world to examine and predict the remaining life of subsea tubulars. The system delivers high-resolution ultrasonic data in real time, which is used to underpin the detailed finite element analysis (FEA) calculations used in industry-standard, fitness-for-service (FFS) determinations.
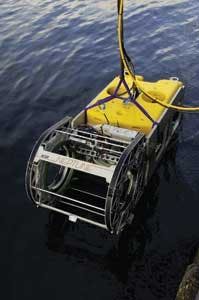
AGR’s Neptune pipe inspection tool undergoing deployment.
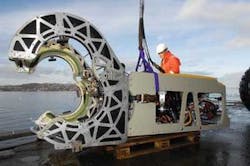
The neutral buoyant Neptune system, weighing 150 kg (331 lb) in air but neutrally buoyant in water, is deployed via an inspection class ROV to the work site. The scanner comprises a hydraulically opening and closing twin collar, 600-mm (23.6-in) wide construction containing a fully automated X-Y scanner. This clamshell construction is self-aligning to allow rapid installation by the ROV.
Self-centering rams within the clamshell hold the scanner firmly on the pipe, creating a stable platform for the X-Y probe carriage. The probe carriage has an axial range of 500 mm (20 in.) and a circumferential movement of over 360º. It is configured to deploy Time of Flight Diffraction (TOFD) transducers for volumetric weld inspection, and compression wave transducers to perform color graphic material mapping.
The historic restriction of analogue data transmission has been removed by locating the AGR Technology Design ultrasonic digital flaw detector on the Neptune scanner. This allows the inspection data to be digitized and processed at the subsea worksite, then sent through the ROV umbilical to be viewed in real time on the surface.
Currently, the Neptune system is configured to operate in water depths of up to 1,000 m (3,280 ft), but this could be extended. The system’s ultimate working or depth range is equivalent to the ROV umbilical length: some ROVs today operate to a range of 6,000 m (19,685 ft).
The ROV pilot and Neptune operator sit together during operations to ensure optimum operational interface. The objective of any examination performed with the Neptune system is to obtain high quality graphical images of parent material, welds, and adjacent HAZ material.
As the probe carriage rasters around the pipe, the data is stored and viewed in real time for both mapping and weld inspection. In TOFD mode, the two transducers straddle the weld at a pre-set standoff to allow volumetric imaging of the weld in one pass.
There are a multitude of ROVs in service around the world, hence the importance of being able to interface mechanically and electronically with any type of inspection class ROV. The size and weight of the self-contained Neptune system allow deployment from, small supply vessels or fixed offshore installations to monitor risers and caissons.
The system also can check pipeline areas following subsea impact, anomaly verification and quantification following IP runs, and to assess potential hot-tap locations. In its current configuration the double-collar scanner is ideal to examine straight pipe and upstream and downstream of bends.
Close-up of Neptune system.
The examination is performed on production pipelines from the external surface. The cleaner the surface, the higher quality the resulting images. Thanks to an existing range of cleaning, excavation, and dredging options, some residing within the AGR group, each proposed inspection site can be addressed individually to optimize the data quality.
Gaining direct access to the pipeline wall may be difficult if the line is concrete-coated, buried, or rock-dumped. In such cases, internal inspection techniques may offer a more cost-effective solution, which AGR again can address via its suite of inspection tools.
Neptune’s current inspection diameter range is 12-18-in. (30-46 cm), with plans to build both smaller and larger diameter collars deploying the same techniques. There are further plans to use the system’s scanner as a platform for other techniques such as ACFM, eddy current, and phased array.
AGR embarked on the development of this technology in the mid 1990s aiming to inspect pipelines not designed for pigging. There are a number of reasons why such services may be required. Many non-piggable lines have reached the limit of their design life, so their integrity needs to be demonstrated if they are to remain in operation.
Again, operators in general are giving greater priority to ensuring the integrity of their pipelines, of any age. Production downtime resulting from loss of a pipeline due to corrosion or a defective weld more than outweighs the cost of regular inspection. And operators also find themselves facing more stringent regulations as authorities seek to avoid environmental damage from pipeline leaks.
Crack detection
Demand has grown for internal and external inspection of pipelines and welds the past year. Last fall, AGR introduced Claycutter X, a technology to excavate the sea bottom and to remove soil from old pipelines. AGR plans to provide the Neptune Subsea Inspection system and Claycutter X as a package to combine excavation, examination, and recovering.
Another development is the WeldScan tool, which the AGR PipeTech division says it aims to promote in the Gulf of Mexico and West Africa. To date the system has been applied only in the Norwegian sector of the North Sea.
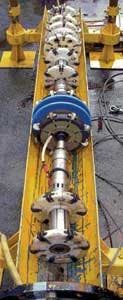
A pipeline inspection train is readied, with AGR’s PipeIntruder, which supplies the motive force, at the front.
Like its predecessor PipeScan, WeldScan is equipped with ultrasonics to measure wall thickness and to detect weld defects. However, using TOFD takes accuracy to new levels, capable of detecting cracks in welds of less than a millimeter for both width and depth. In other words, cracks can be identified much earlier.
This meets the needs of increasing application of exotic and high-grade steels in pipelines and risers to cope with multiphase flows and corrosive wellstreams. These materials are often difficult to weld, so regular monitoring of welds is required.
The move into deeper waters also places a premium on reliable integrity monitoring techniques, i.e. for inspecting steel catenary risers which are exposed to severe loadings.
WeldScan has proved its worth in examining pipelines made of high-grade steel – in this case 13% chrome – in a number of assignments carried out for an operator in the Norwegian sector.
AGR also has developed a method to transport its inspection tools through the pipeline. This is self-propelled pig, known as PipeIntruder, incorporates a seal disc with an internal bypass. Water is pushed through the seal disc by a pump at the front, creating back-pressure to push the tool forward. Pumping can be reversed, sending the tool backwards.
An odometer wheel tracks PipeIntruder’s position in the pipeline. The tool also has axial and circumferential motors to position WeldScan alongside a weld with ±1mm (0.04 in.) axial accuracy. Video cameras monitor this operation. Data from WeldScan is transmitted to the surface via fiber-optic cable in real time.
The PipeIntruder is available for pipe diameters from 8-30 in. (20.3-76.2 cm). Above 30 in. (76 cm), electro-hydraulic tractors are available. The pig hauls all combinations of inspection tools, and can travel up to 10 km (6.2 mi), the maximum range of the umbilical winch.
The string made up of the PipeIntruder and inspection tools is inserted into the pipeline at the host platform. The tools can be used to inspect other tubular structures such as risers, J-tubes, and loading lines.


